The Impromed connection allows you to export documents from CoVet to your PMS with a single click so you can get on with your day.
There are multiple articles that will help you with different aspects of the Impromed connection.
Use these links to jump between these articles quickly.
Important to read before using the connection
How to use the connection following set-up
There are multiple articles that will help you with different aspects of the Impromed connection.
Use these links to jump between these articles quickly.
Important to read before using the connection
How to use the connection following set-up
As you create content within those linked CoVet cases, such as documents, notes, and records, the connection allows you to export that content back to Impromed. This ensures all case-related materials are automatically saved under the correct patient record in Impromed, reducing manual work and keeping patient files complete and up to date.
1. Navigate to the case you want to export from
You can easily export your content from CoVet back into Impromed with a single click.
Click into the case you want to export to get started.

2. Select and review the document you want to export
From within your linked case in CoVet, locate the record you wish to export to Impromed in the case content feed. Click on the record to open it. In this instance, we are using the SOAP record.
You will have the opportunity to review the record and make any necessary edits at this stage, just as you normally would when preparing case content. Once you are satisfied with the content, proceed to the next step to export the record.

3. Export the document to Impromed
When you're ready to send the document to Impromed, click the Export to Impromed button at the top right.
Clicking this will export the record directly into Impromed, associating it with the correct patient and appointment, thanks to the established case link.

4. Review and finalize your export
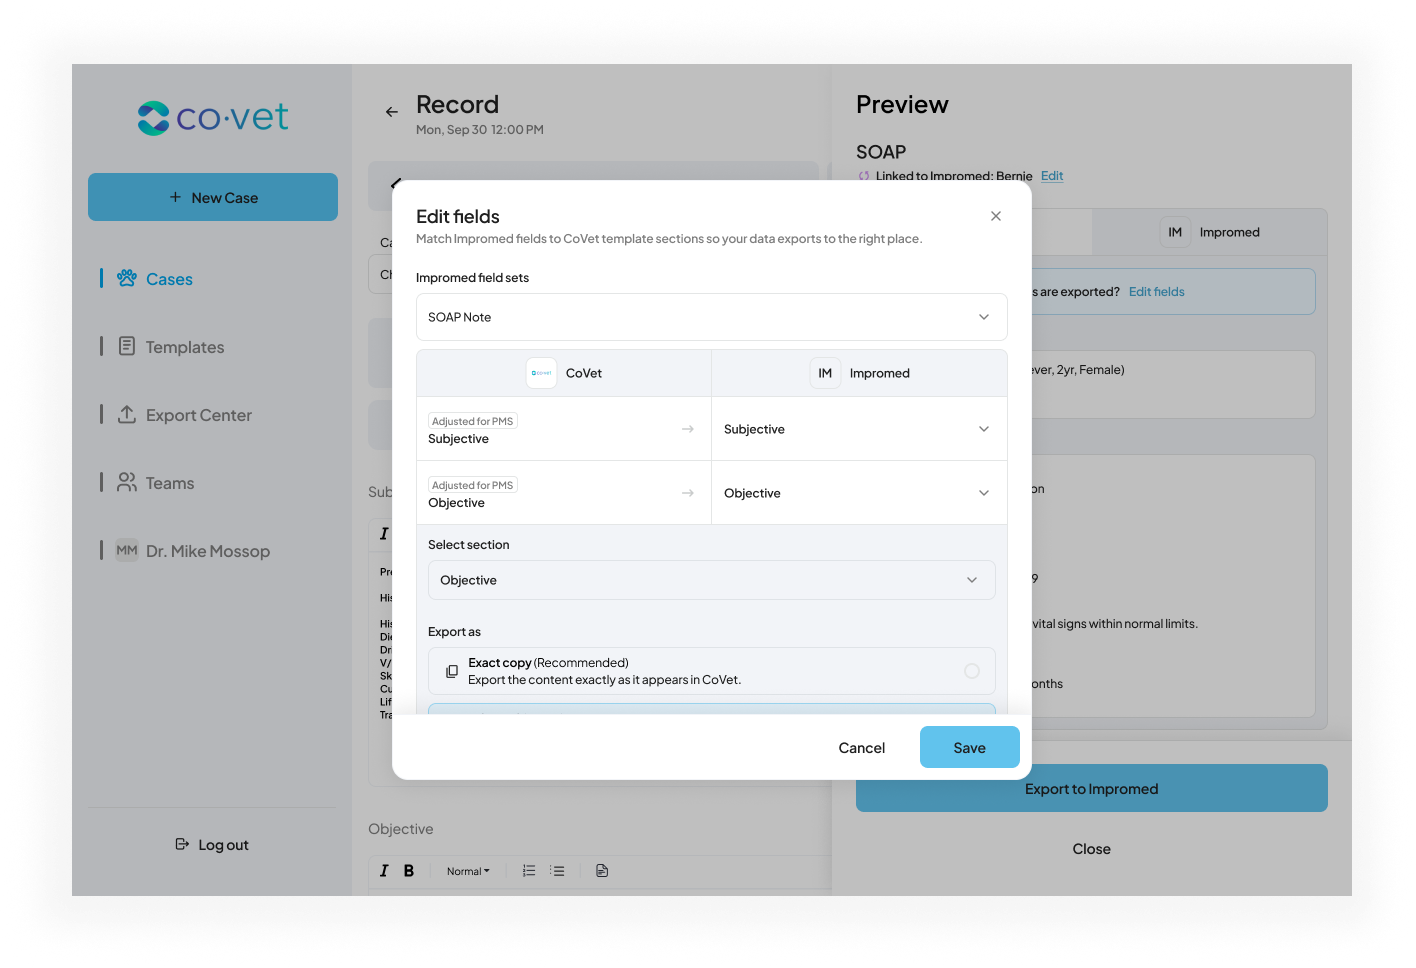
After clicking Export to Impromed, a pop-up will appear on the right-hand side of the screen showing a preview of your record and how it will appear in Impromed. If you are happy with the record, you can click the blue Export to Impromed button or you can click Edit fields to make any changes.
Note: Only the SOAP record can be exported into the individual sections of your PMS. If you are using a Custom Template, you will need to export your record to a Medical Note.


Dealing with unlinked cases
If a case was imported from Impromed (either automatically or manually) it will already be linked, and you will see Export to Impromed.
If your case is currently unlinked, you will see a note that the case is Not linked to Impromed. Within the record, when you click Export to Impromed in the top right, the button at the botton of the preview will appear as Continue instead of Export to Impromed within your case. Here you will have the ability to link your case. This step is required to get your record into Impromed.


Once you’re satisfied with the preview of the document contents, click Export to Impromed to complete the export. The record will then appear in Impromed under the correct patient.
5. Voilá! You're done and can move on to your next case
Your document content will appear in Impromed just where you need it.
Medical Notes
From the “I” menu → Modules → Medical Records. Click the Note tab. The + will expand the note, and double-clicking will open it.

SOAP Notes
From the “I” menu → Modules → Medical Records. Click the SOAP tab. The + will expand the note, and double-clicking will open it, where the details can be viewed.
Users can edit the notes after they’ve been written by opening the note, then clicking the “Unlock” button.

5. Voilá! You're done and can move on to your next case
Your document content will appear in Impromed just where you need it.
Medical Notes
From the “I” menu → Modules → Medical Records. Click the Note tab. The + will expand the note, and double-clicking will open it.
SOAP Notes
From the “I” menu → Modules → Medical Records. Click the SOAP tab. The + will expand the note, and double-clicking will open it, where the details can be viewed.
Users can edit the notes after they’ve been written by opening the note, then clicking the “Unlock” button.
Was this article helpful?
That’s Great!
Thank you for your feedback
Sorry! We couldn't be helpful
Thank you for your feedback
Feedback sent
We appreciate your effort and will try to fix the article